nginx를 docker 컨테이너로 실행하여 로드밸런싱 하는 방법에 대해 소개합니다.
info
(Docker)Nginx와 Tomcat을 활용한 로드 밸런싱 및 무중단 배포하기 해당 글을 참고하였습니다.
docker-compose 작성
먼저 로드 밸런싱을 위한 nginx server와 test를 위해 tomcat server를 2개 띄어보겠습니다.
편리하게 실행하기 위해 docker-compose 를 작성합니다.
docker-compose.yml
version: "3.8"
services:
  nginx:
    image: nginx
    container_name: nginx
    restart: always
    ports:
      - 80:80
    volumes:
      - ./nginx/nginx.conf:/etc/nginx/nginx.conf
  tomcat1:
    image: tomcat
    container_name: tomcat1
    ports:
      - 10001:8080
    volumes:
      - ./tomcat1/webapps/:/usr/local/tomcat/webapps/ROOT
  tomcat2:
    image: tomcat
    container_name: tomcat2
    ports:
      - 10002:8080
    volumes:
      - ./tomcat2/webapps/:/usr/local/tomcat/webapps/ROOT
배치 파일 추가
위에서 작성한 docker-compose 를 보면 볼륨 마운트가 되어있습니다.
nginx 의 경우 config를 쉽게 변경하기 위해 tomcat 의 경우 로드 밸런싱의 결과를 확인하기 위해 정적 파일을 쉽게 추가하도록 마운트 되어있습니다.
nginx.conf 와 같이 파일을 마운트 하는 경우 해당 경로에 파일이 없으면 아래와 같이 오류가 출력됩니다. 먼저 실행 전에 해당 파일을 작성하도록 하겠습니다.
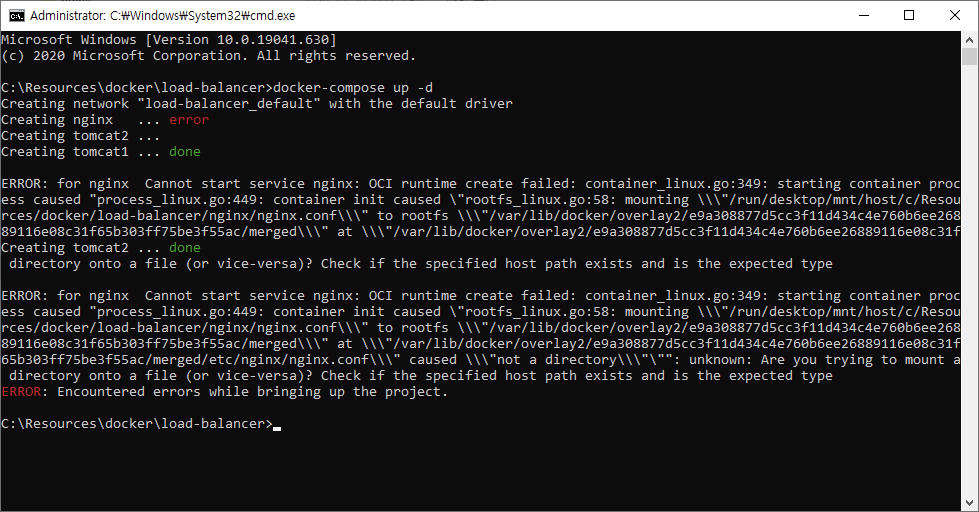
하이어라키
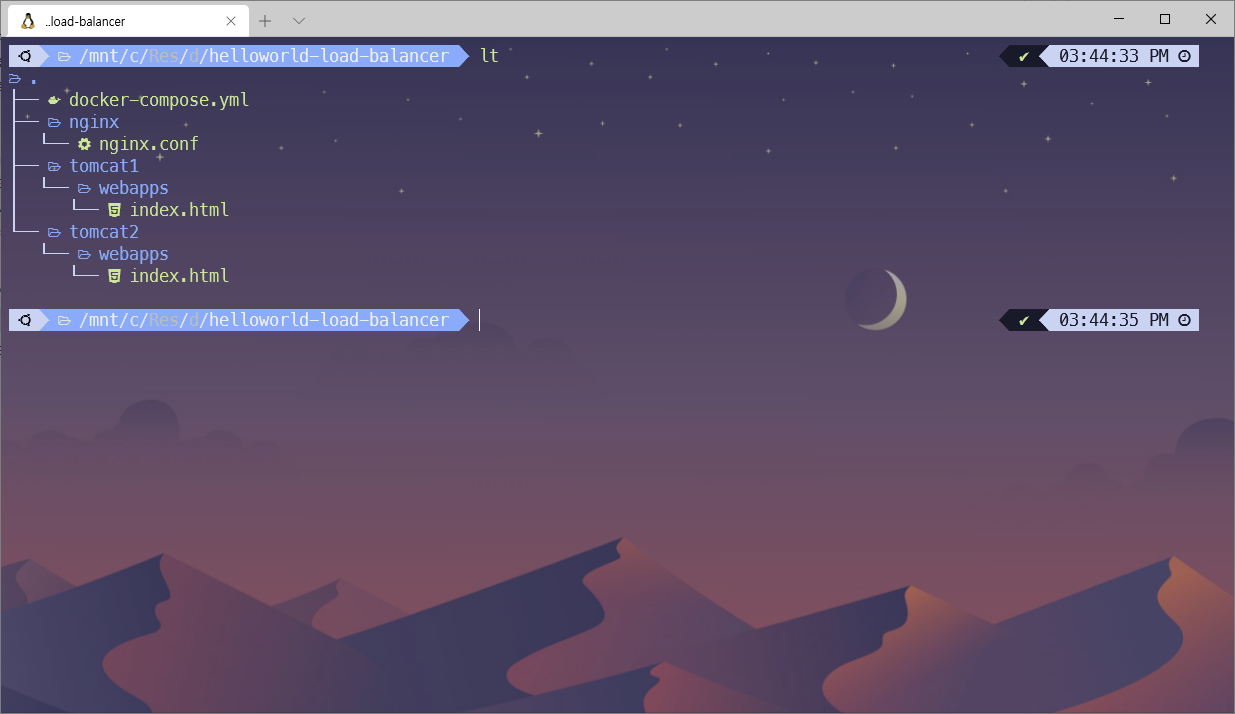
Source Code
./nginx/nginx.conf
user  nginx;
worker_processes  1;

error_log  /var/log/nginx/error.log warn;
pid        /var/run/nginx.pid;


events {
    worker_connections  1024;
}


http {
    include       /etc/nginx/mime.types;
    default_type  application/octet-stream;

    log_format  main  '$remote_addr - $remote_user [$time_local] "$request" '
                      '$status $body_bytes_sent "$http_referer" '
                      '"$http_user_agent" "$http_x_forwarded_for"';

    access_log  /var/log/nginx/access.log  main;

    sendfile        on;
    #tcp_nopush     on;

    keepalive_timeout  65;

    #gzip  on;

    # 여기 아래부터 기본 값 수정했습니다
    # include /etc/nginx/conf.d/*.conf; (제거하지 않으면 설정해도 기본 설정을 타게 됩니다)
    upstream tomcat-project {
        server 52.231.50.84:10001;
        server 52.231.50.84:10002;
    }

    server {
        listen 80;
        location / {
            proxy_pass http://tomcat-project;
        }
    }
}
실제 default nginx.conf
user  nginx;
worker_processes  1;

error_log  /var/log/nginx/error.log warn;
pid        /var/run/nginx.pid;


events {
    worker_connections  1024;
}


http {
    include       /etc/nginx/mime.types;
    default_type  application/octet-stream;

    log_format  main  '$remote_addr - $remote_user [$time_local] "$request" '
                      '$status $body_bytes_sent "$http_referer" '
                      '"$http_user_agent" "$http_x_forwarded_for"';

    access_log  /var/log/nginx/access.log  main;

    sendfile        on;
    #tcp_nopush     on;

    keepalive_timeout  65;

    #gzip  on;

    include /etc/nginx/conf.d/*.conf;
}
./tomcat1/webapps/index.html
<!DOCTYPE html>
<html>
  <head>
    <meta charset="UTF-8" />
    <title>Document</title>
  </head>
  <body>
    tomcat1
  </body>
</html>
./tomcat2/webapps/index.html
<!DOCTYPE html>
<html>
  <head>
    <meta charset="UTF-8" />
    <title>Document</title>
  </head>
  <body>
    tomcat2
  </body>
</html>
실행
해당 파일 경로로 이동하여 docker-compose up -d 으로 실행하도록 합니다.
tip
docker-compose 를 실행하는 디렉토리명이 -p 이름이 됩니다. 때문에 디렉토리명을 -p 으로 작성하면 편리합니다.
확인
새로고침 결과 정상적으로 tomcat1과 tomcat2가 스위칭 되는것을 확인할 수 있습니다.